
Total Solar Eclipse Photography Guide
*NOTE: I have never photographed a total solar eclipse. The last transcontinental solar eclipse in the United States was in 1918. This guide is based on my research and practice with solar photography.
What is a solar eclipse?
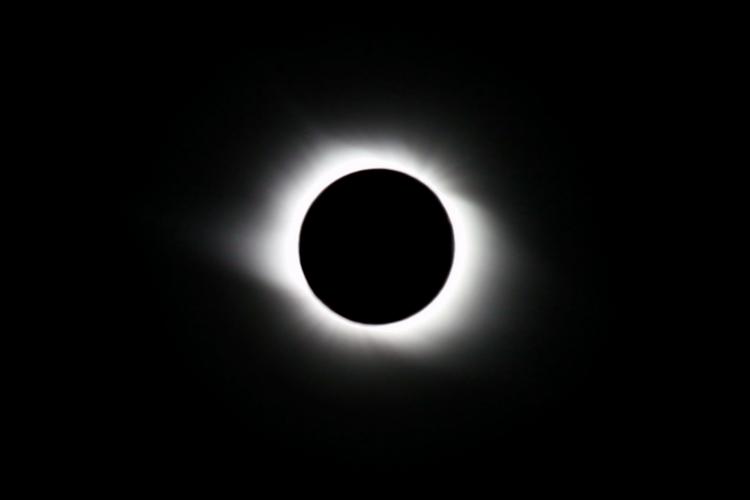
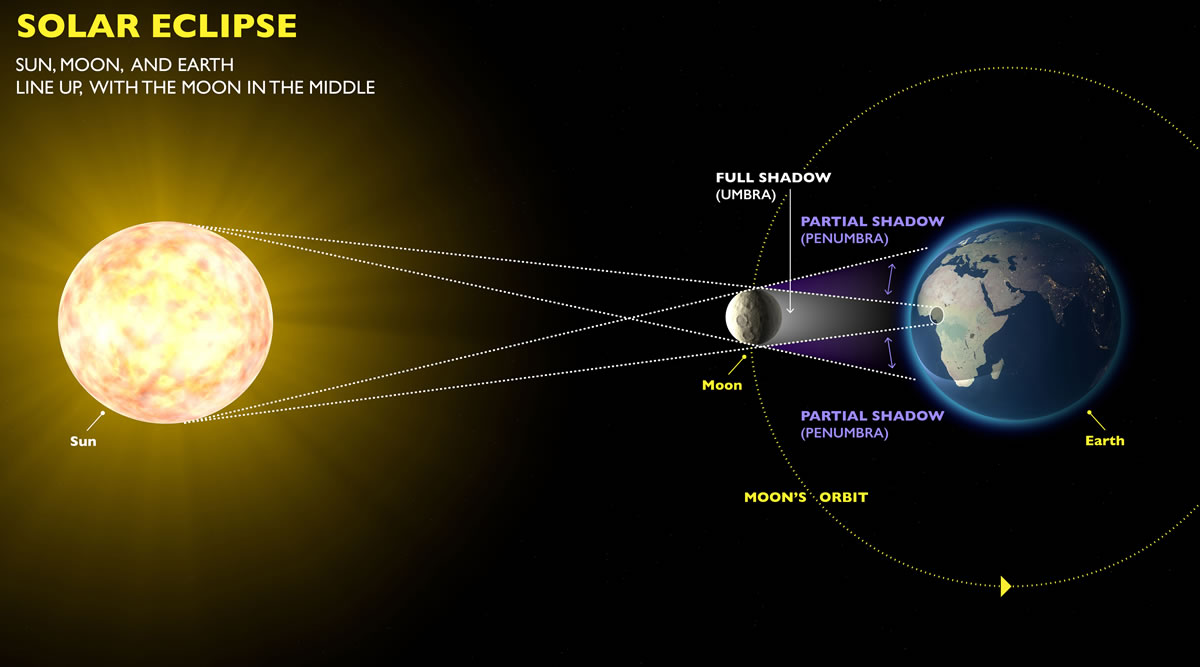
A solar eclipse is when the moon passes between the sun and the earth, partially (partial eclipse) or fully (total eclipse) blocking sunlight. In the path of totality, day will seem to turn to night, and during totality you will see the sun's corona (atmosphere). More on solar eclipses on Wikipedia.
When is the total solar eclipse?
August 21, 2017.
Greenville, SC
Partial eclipse 1:09PM-2:37:59PM. Total eclipse 2:38PM-2:40:11PM. Returns to partial eclipse 2:40:11-4:03PM. Duration of totality is 02 minutes 11 seconds.Eclipse Times For Other Cities
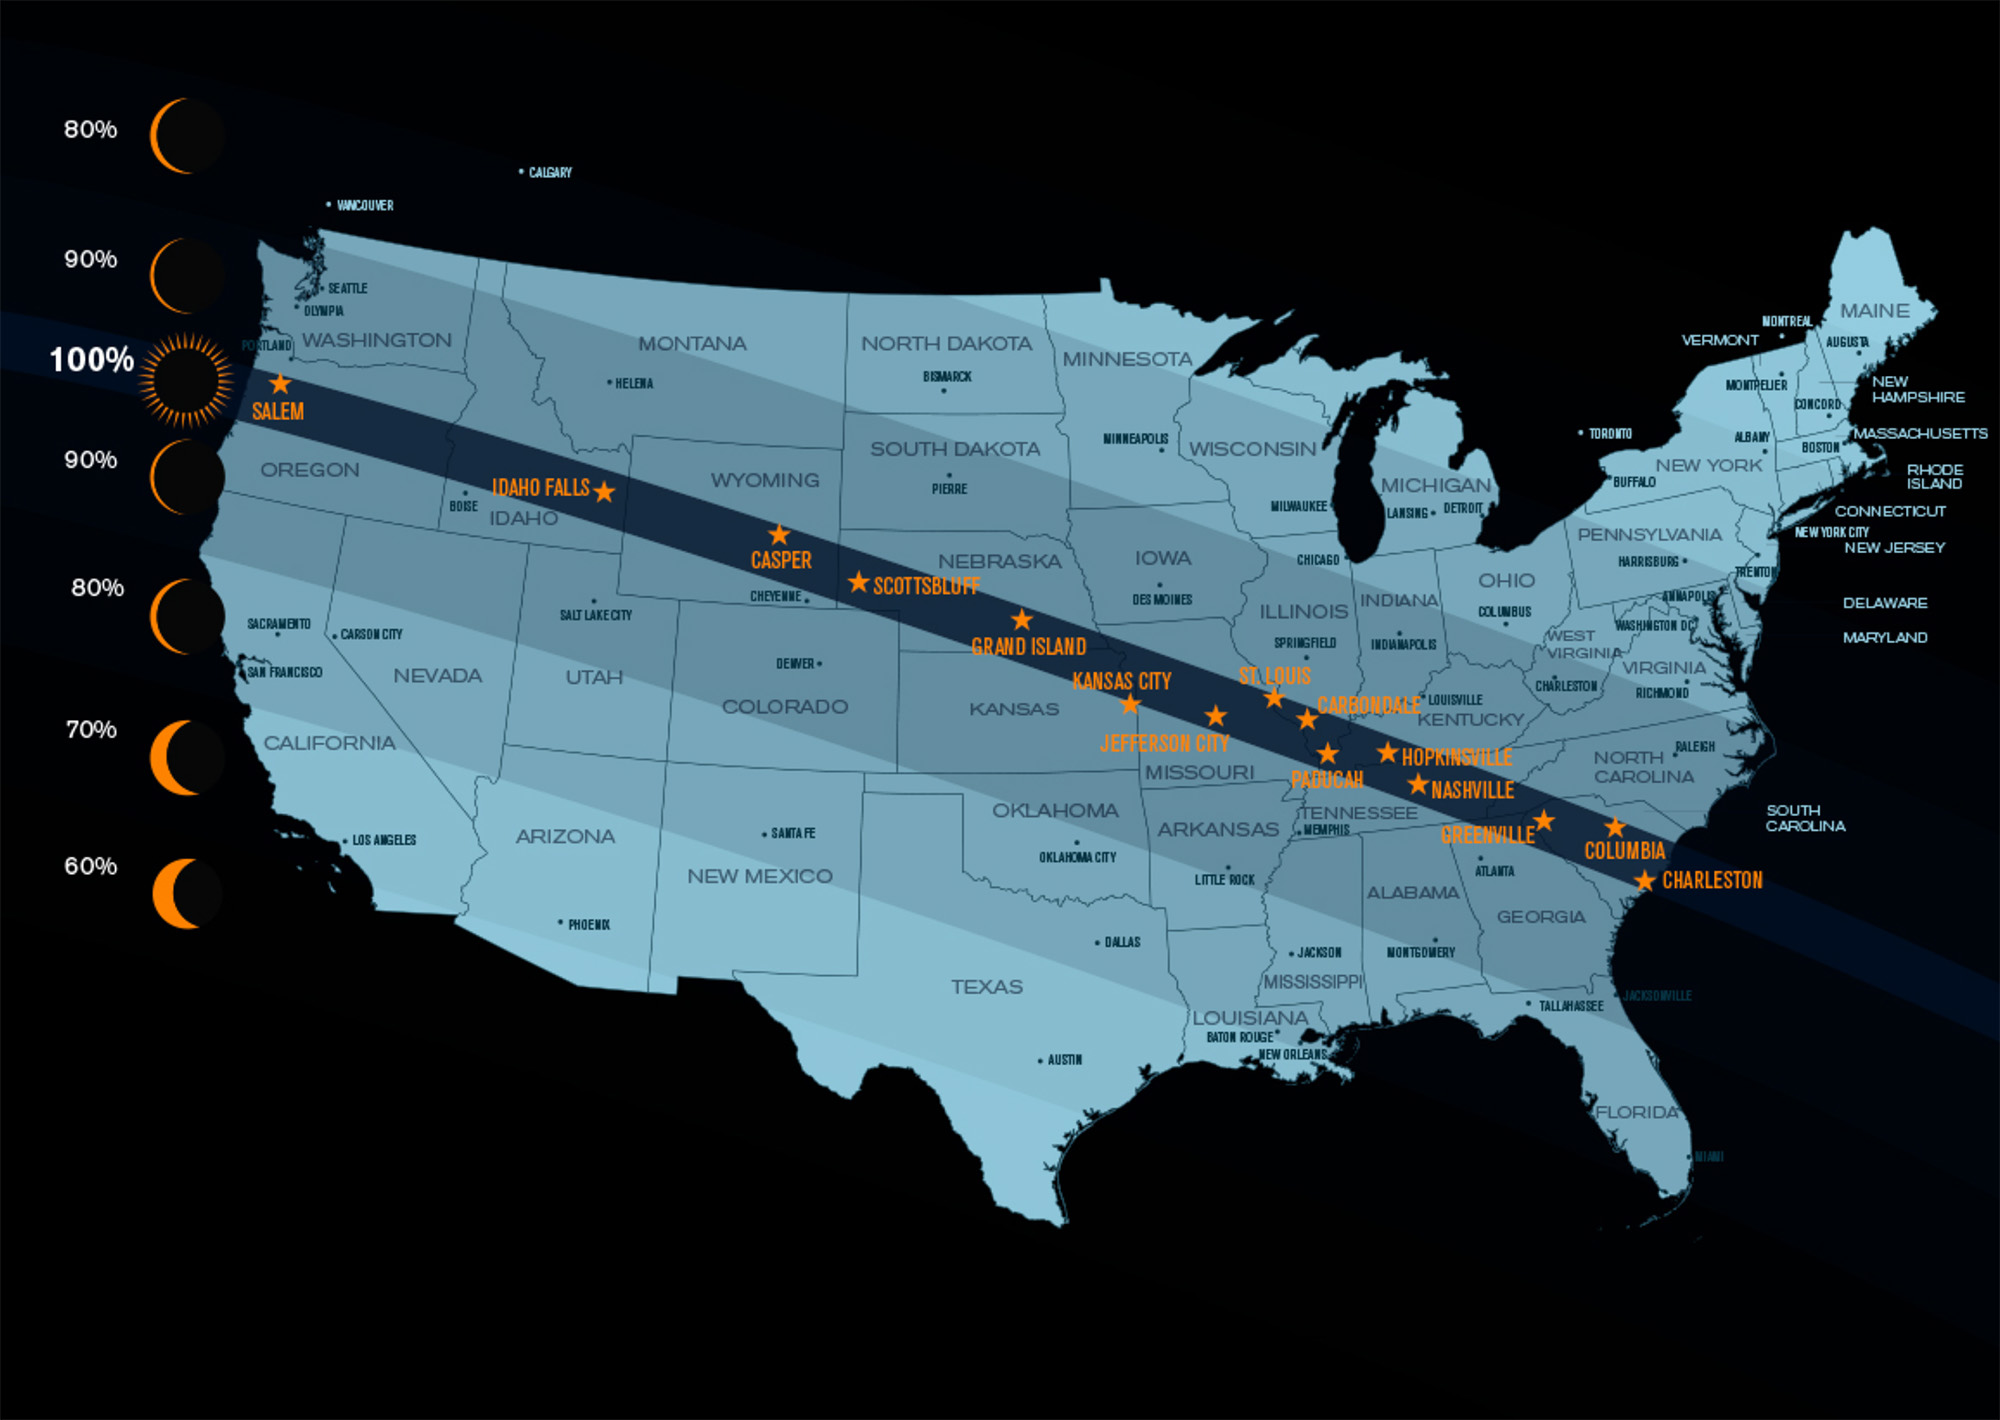
Where is the total solar eclipse viewable?
When is the next total solar eclipse passing over the whole United States?
2024 and 2045. The path of totality will be north and south of South Carolina. So if you can't travel for those, this will likely be a once in a lifetime event for you since the next total solar eclipse won't pass over this region until 2078.
Safety guide, warnings, and important information
View this Important Safety Guide.
• Also please follow the safety guidelines by NASA and AAS (American Astronomical Society).
Tips
• Plan alternative viewing locations and check the weather forecast hours and a few days prior to make sure you can view the eclipse from your planned location.
• Be at your viewing location ahead of time, by hours, or even days, because of problematic traffic conditions.
• Practice photographing the sun prior to the eclipse day to get used to a solar filter and adjusting your settings.
• Make a time-lapse with your DSLR or GoPro.
• Take pictures with a wide lens to get a scenic shot.
• Use a red flashlight during totality so you don't mess up your night vision.Checklist
▢ Water
▢ Snacks
▢ Cooler for water and snacks
▢ Ice or ice packs for cooler
▢ Sunscreen
▢ Hat (baseball cap, garden, or beach)
▢ Proper clothing
▢ Sun umbrella or beach tent
▢ Folding chair(s)
▢ Handheld fans
▢ White hand towels
▢ Phone charger (car, wall, and battery backup pack)
▢ Full tank of gas in car
▢ Large white sheet (shadow banding)
▢ Solar filter glasses
▢ Camera
▢ Long zoom lens
▢ Camera lens solar filter
▢ Large memory card
▢ Extra camera batteries
▢ Tripod
▢ Red flashlight (light during totality)
▢ Masking tape
▢ Exposure guide
▢ Total solar eclipse photography guideItems needed
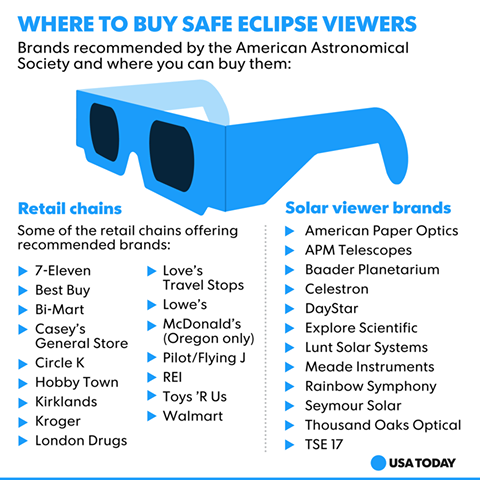
Solar filter glasses (to protect your eyes)
NASA and the American Astronomical Society approve of specific solar filter glasses brands with ISO safety rating 12312-2.
• Full list of approved solar filter glasses and retailers.
• Quick infographic:
Camera lens solar filters (to protect your camera)
• Lens cover
Covers that fit over your DSLR lens or telescope. Measure the diameter of your lens body, not the filter size to get the correct size.
DayStar 90mm universal solar filter lens cover (cardboard body) - meets the ISO requirements
Helios solar filter lens covers (aluminum body) - meets the ISO requirements
• Handheld
A cardboard cut-out with a circular solar filter that you hold up to your lens.
Celestron Eclipsmart handheld filter - meets the ISO requirementsAlternative filters (not all of these are recommended by NASA )
• Neutral density filters (ND Filters) - WARNING: This filter may not block all wavelengths of light (infrared and ultraviolet). There is a possibility your camera sensor can get damaged. Use the LCD screen and not the viewfinder to view the sun and frame your picture.
Make sure you check the bottom or front of your lens for the filter size (ex. 58mm, 62mm, 72mm, 77mm). This screws into the front of your lens or on top of your current UV filter attached. Neutral density filters stop down and reduce the light intensity. A solar filter has 16.6 stops of light. You need at least an ND100000 to photograph the sun. Stacking an ND1000 (10 stops) and ND64 (stops) filters is also an option but not recommended.
ND100000 filters• Solar filter sheet
Solar filter sheet is what you find in solar filter glasses. They come in square sheets that you can cut with a razor in a circle to tape into a standard UV filter, or cut into a smaller square to fit into a square filter holder.
8" Solar filter sheets - meets the ISO requirements• Welding glass
Welding glass shade 14 will provide 18 stops of light reduction. They can cast the sun as green, blue, or gray. That can be corrected in post-processing/editing.
Welding glass (Shade 14)Long Zoom Lens
A 200mm lens is ideal to get a good sized sun in your picture frame. A focal length of 2000mm would fill close to the entire picture frame with the sun.
DX/Crop = lens for crop sensor camera. FX/Full = lens for full frame sensor camera.
Canon 55-250mm (Crop) f/4.0-5.6 $108
Canon 75-300mm (Crop) f/4-5.6 $80
Canon 70-300mm (Full) f/4-5.6 L $1349
Canon 70-200mm (Full) f/2.8 L $1949
Canon 100-400mm (Full) f/4.5-5.6 L $2049
Canon 1.4X Teleconverter $429
Canon 2x Teleconverter $429
Nikon 55-200mm (DX) f/4-5.6 VR $146
Nikon 70-300mm (DX) f/4.5-6.3 Refurbished $118
Nikon 70-300mm (FX) f/4.5-6.3 Refurbished $114
Nikon 70-200mm (FX) f/4 VR $1396
Nikon 70-200mm (FX) f/2.8 VR FL $2796
Nikon 200-500mm (FX) f/5.6 VR $1396
Nikon 1.4X Teleconverter $496
Nikon 2X Teleconverter $499 (will only autofocus with some lenses)
Mirror lenses (all manual focus and not as sharp as regular lenses)You can also attach your camera body to a telescope. Most basic telescopes range from 600mm to 1200mm in focal length.
Rokinon, Sigma, Tamron, Tokina, and other companies make great lenses too.Tripod
Most any tripod will work to mount your camera. If you want a faster response time to move your camera since the sun moves rapidly while zoomed in, you can get a pistol grip or ball head. Check the tripod's max weight to make sure it will support your camera and lens. You can also get a tracking mount attachment for your tripod, that will automatically move your camera and follow the sun. Great brands include: Benro, Dolica, Davis & Sanford, Manfrotto, and Vanguard.
Photography steps with a DSLR
Photograph in RAW instead of JPG, if your camera has that feature. You will need Lightroom, Photoshop, or other software to post-process/edit these files. They are also very large in file size compared to JPG.
You can also bracket (bracket mode on camera allows you to take multiple pictures right after each other at different stops or exposure values (adjusting the brightness), so that you can ensure you have a well exposed picture.Before the partial eclipse starts
1. Place your camera on a tripod. Attach a solar filter to your lens and put on solar filter glasses.
2. Set your focus to manual, and infinity or near infinity. Then aim your camera at the sun.
3. A great f/stop is around f/8 to allow for a deep depth of field, making the sun sharper. Start at a low ISO.
4. Take some test pictures of the sun and check your settings to see if you need to change the shutter speed, f/stop, and/or ISO. It's best to set your camera mode to manual. Refer to the exposure guide below for specific settings.
• Shutter speed, lowering will increase the amount of light let in and brighten. Raise to darken.
• f/stop, lowering will make the depth of field more shallow and let more light in. Raise to sharpen and darken.
• ISO, lowering will reduce light sensitivity for the image sensor, darkening the image. Raise to increase light sensitivity and brighten. The higher the ISO value, the more noise and grain will be visible.
5. Take a few pictures to have pictures of the sun before the eclipse.
Once the partial eclipse starts
1. Take pictures and double check your settings to see if they need adjusting as the sun light decreases.
2. You can take pictures every 5 minutes so you can show the movement of the moon.
3. During this time, also take pictures of shadows around you to show the phase of the sun.
4. Right before the total eclipse watch for Baily's beads, shadow bands, and the diamond ring effect to photograph that. Some sources say to remove your solar filter at this time, about 10-20 seconds before totality.
Total eclipse starts
1. Quickly remove your lens filter and solar filter glasses.
2. Everything will go dark and the sun's corona (atmosphere) will be dim compared to the full power of the sun. The brightness varies each eclipse. Adjust your camera settings to a low light scenario. Refer to the exposure guide below for specific settings.
3. The sun's chromosphere (lower atmosphere) will be visible for a few seconds after totality.
4. You will have a little over 2 minutes, so be fast and take as many pictures as you can or want.
5. Right before totality ends, put your lens filter and solar filter glasses back on.
Second and final partial eclipse phase1. Follow the steps for the first partial eclipse, followed by a few pictures of the sun back to it's normal phase.
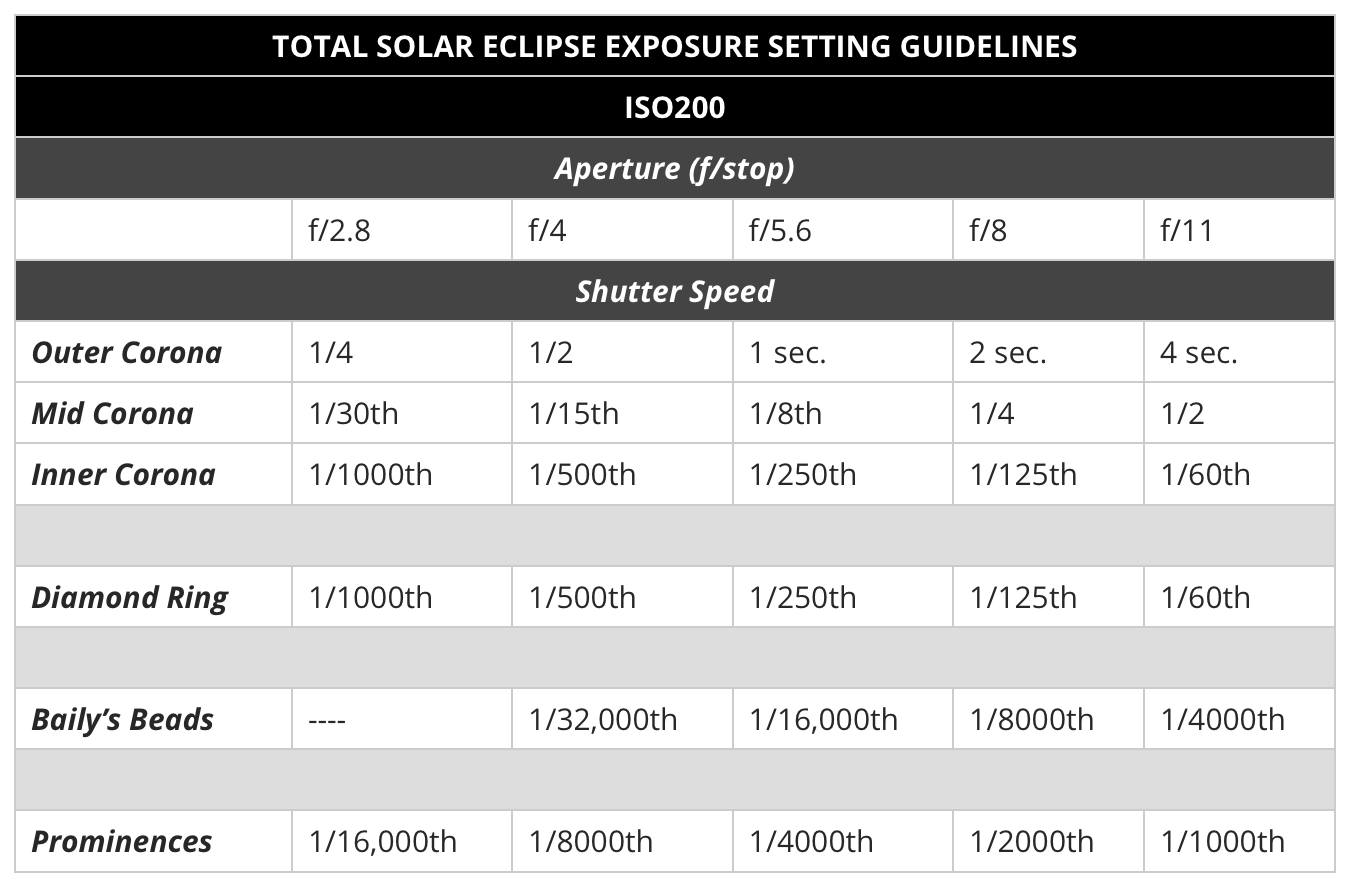
Exposure guide
Here is an exposure guide below (when not using a filter), which is what I will be using. Remember when changing the ISO to adjust the f/stop and shutter speed accordingly.
My settings when I photograph the sun with a DayStar 90mm universal solar filter lens cover are: f/8 1/250s ISO 200. I will use settings similar to this during the partial eclipse.
Cell phone and mobile device
• Turn off your flash.
• Hold a pair of solar filter glasses in front of your lens (or tape it with masking tape to your phone) to photograph the sun during the partial eclipse. No solar filter is needed during the total eclipse phase.
• Use a tripod, especially during the total eclipse phase since it will be very dark.
• Use a telescopic adapter for your phone, otherwise the sun itself will be tiny even when using the digital zoom, because of wide angle lens built into most phones.
• Use a specialized camera app instead of the basic camera app built into the phone to use manual focus, specific shutter speeds, f/stop, and ISO settings.
Camera Apps
• Camera+, built-in stabilizer sensor
• Manual, All of your controls on screen at once *A favorite*
• Moment, average (really meant for using their add-on lenses)
• MuseCam, above average
• ProCamera, lots of extras *A favorite*
• VSCO, the best for social media, with great in app editingTelescope
• Use a T-Adapter (pick the correct size that correlates with your telescope, ie. 1.25") and T-Ring (pick the mount that matches your camera, ie. Canon, Nikon, Sony) to adapter your DSLR to your telescope, giving you the power of a telescope such as 700mm or 1200mm, but the f/stop will be around f/8 to f/16.
T-Adapters and T-RingsTimeline
Check your local time. These are the time (PM) estimates for Greenville, SC.
1:09:00 1st contact, partial eclipse begins
Shadows in the shape of crescents will be visible through tree branches and
other objects.2:37:00 Shadow bands start
2:37:45 Diamond ring visible
2:37:55 Baily’s beads visible
2:38:00 Shadow bands end (take off solar glasses)2:38:00 2nd contact, total eclipse begins (totality)
Temperature drops, wind speed and patterns change, animals are confused,
and you can see stars and planets.2:38:03 Chromosphere (red ring), the sun’s lower atmosphere is visible
2:38:05 Corona, the sun’s upper atmosphere is visible (white)2:40:05 Put on solar glasses right before totality ends
2:40:11 3rd contact, total eclipse ends and partial eclipse begins
2:40:11 Baily’s beads visible
2:40:16 Diamond ring visible2:40:16 Shadow bands start again
2:41:16 Shadow bands end4:03:00 4th contact, eclipse ends
Important moments during the eclipse
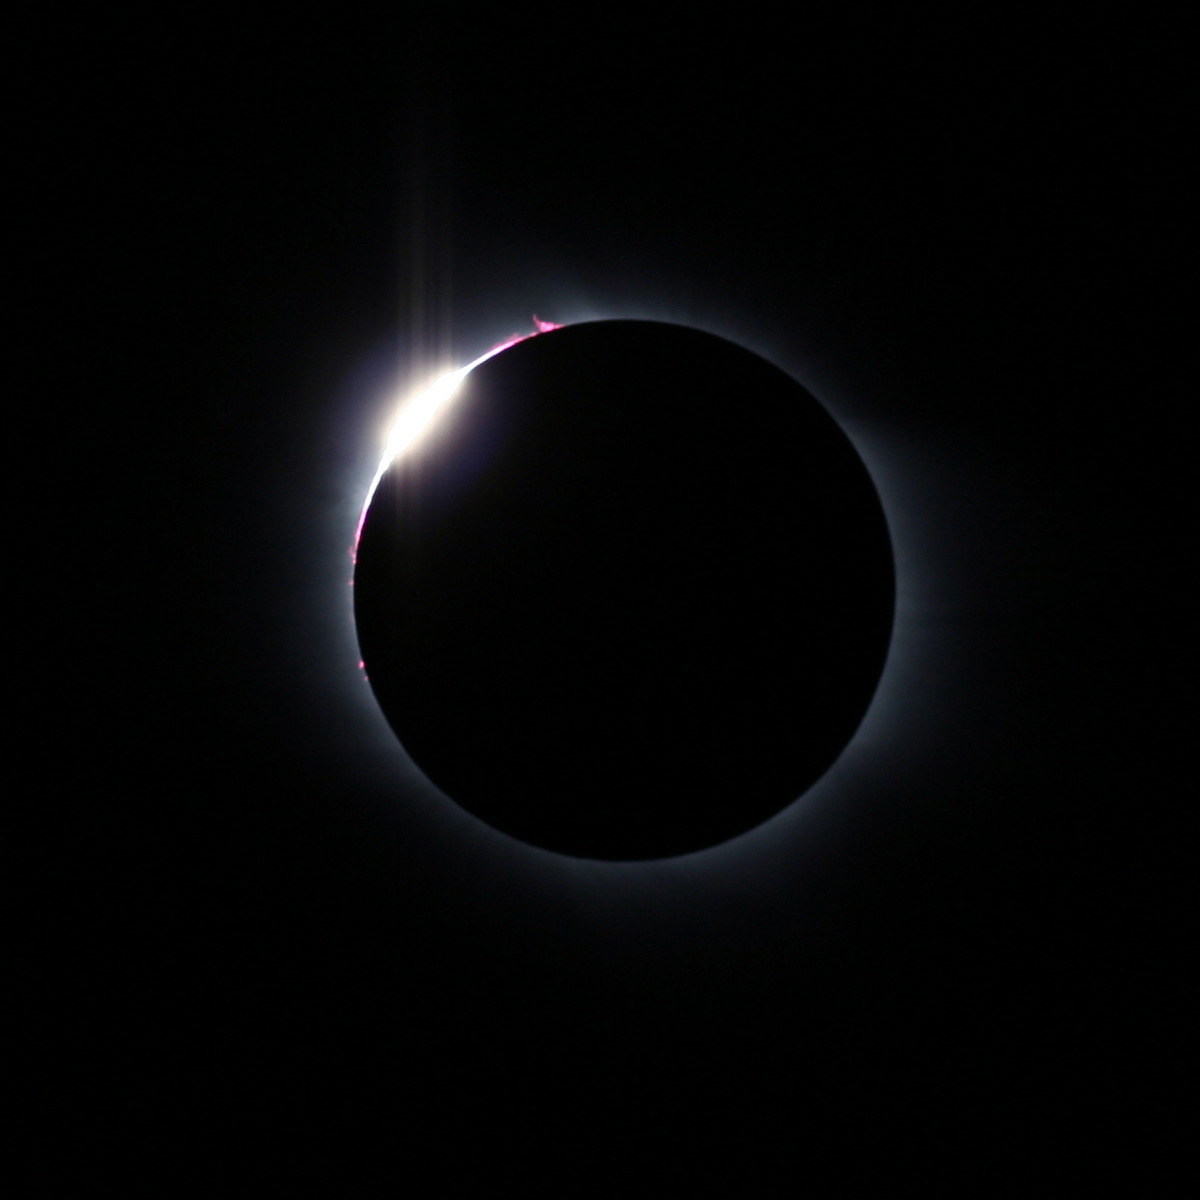
Baily's Beads
Right before the total eclipse some sun light will peek through craters on the moon, causing 'beads' or small extra bright spots to be visible around the moon. This is seen about 5 seconds before and after totality.
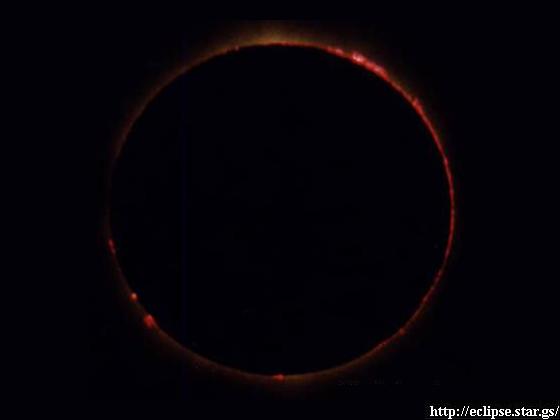
ChromosphereThe sun's lower atmosphere is visible as a red glow will be visible shortly, a few seconds after totality starts, including prominences.
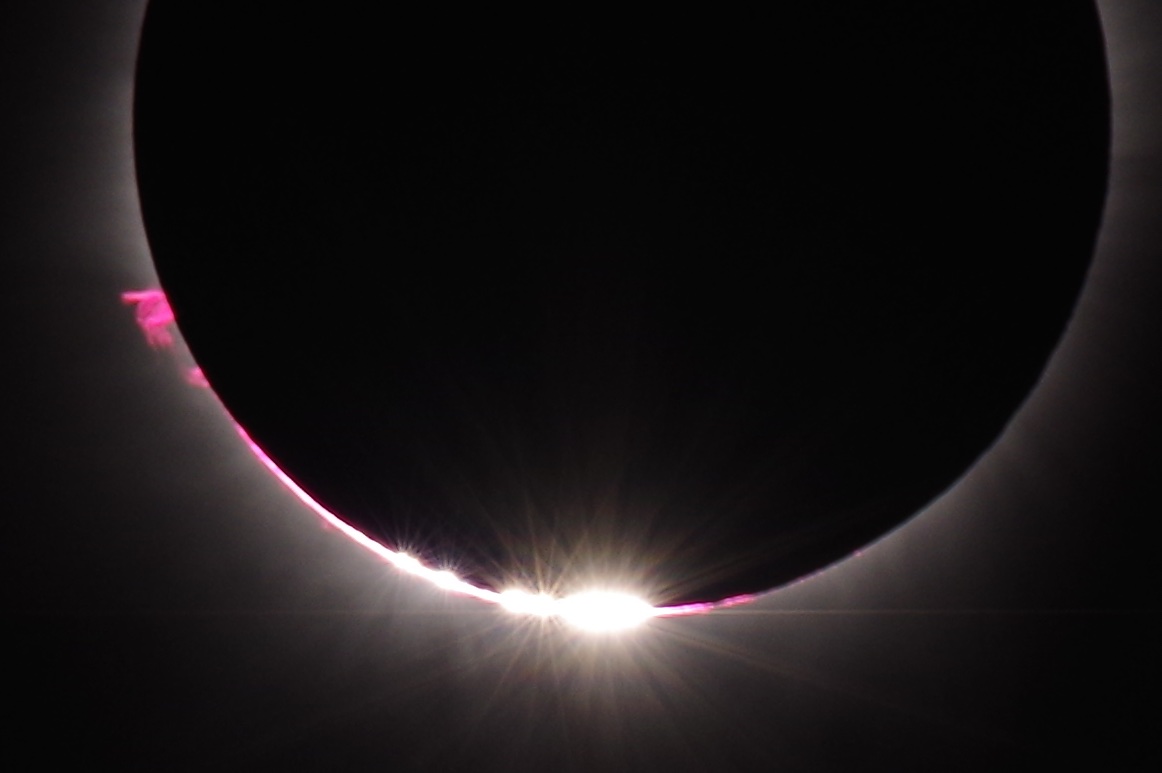
Diamond Ring Effect
A ring forms around the moon with a small spot that shines like a diamond ring. This is seen about 10-15 seconds before and after totality.
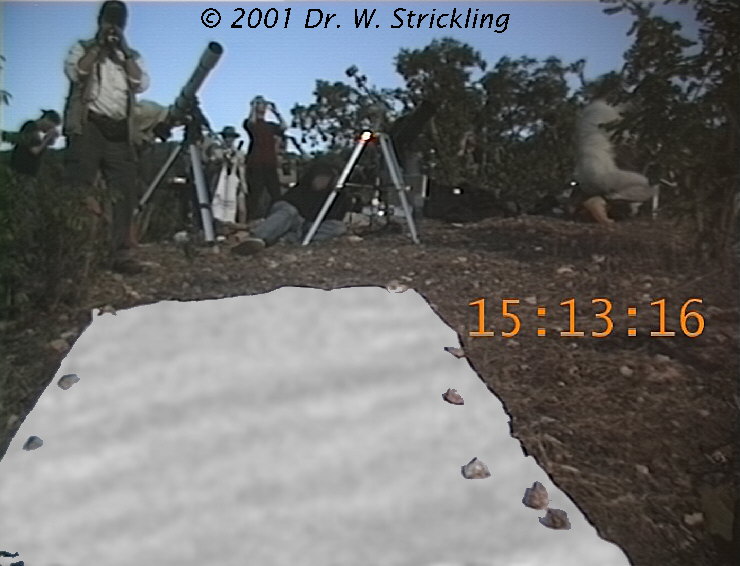
Shadow bandsDark and light wavy lines of shadows appear on the ground about 60 seconds before totality and last for about 60 seconds after totality. Bring a large white sheet or white poster board to view and photograph this phenomenon.
Shadows
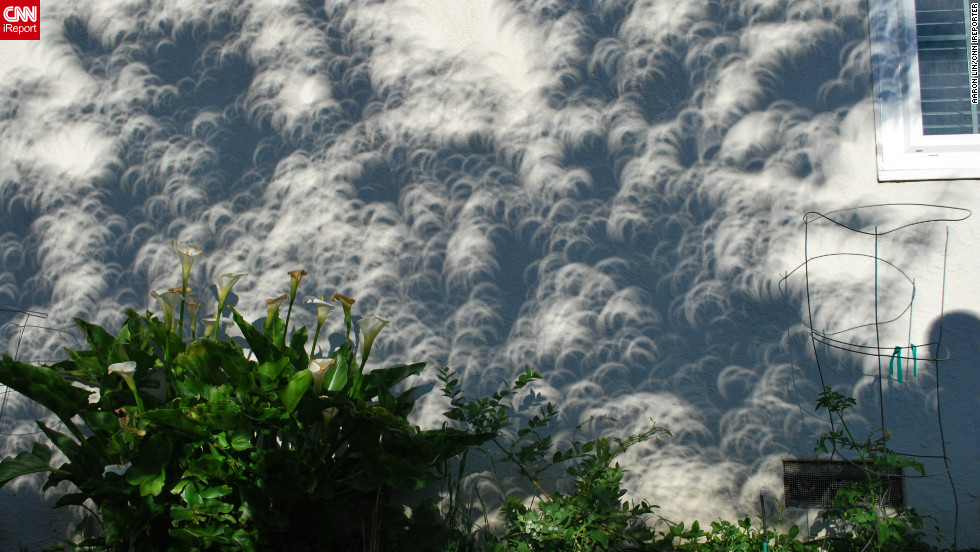
During a partial eclipse, the sun will cast shadows shaped like the eclipse such as a crescent. Be sure to photograph these moments on the ground, walls, or even people. You'll likely find shadows around trees. Or make your own with paper cutouts.
Totality
The moon will block the sun during totality, allowing you to view the upper atmosphere (corona) of the sun. The temperature will drop during this time. Wind patterns and speeds may change. Birds may begin to chirp.
More guides and resources for photographing solar eclipses
• Canon (very thorough)
• B&H PhotoVideo (quick overview)
• Mr. Eclipse
• National Geographic
• NikonWhat will your setup be?
Camera 1
Nikon D810
Nikon 200-500mm f/5.6 ED VR lens
Nikon TC-20E III (2.0x) teleconverter (during 2nd partial eclipse)
Helios 4" solar filter lens cover
Benro Mach3 2 Series Aluminum Tripod and Benro Triple Action Ball Head (IB2)
Sandisk Extreme 128GB CF (120MB/s) memory card
Sandisk Extreme 128GB SD (95MB/s) memory card
Sandisk Extreme 32GB CF (160MB/s) memory card (during totality)
Sandisk Extreme 32GB SD (280MB/s) memory card (during totality)Camera 2
Nikon D800
Nikon 70-200mm f/2.8G ED VR lens
Nikon TC-14E III (1.4x) teleconverter (during partial eclipse)
DayStar 90mm universal solar filter lens cover
Vanguard VEO 265AB Aluminum Travel Tripod
Sandisk Extreme 128GB CF (120MB/s) memory card
Sandisk Extreme 128GB SD (95MB/s) memory cardCamera 3
Nikon D800
Nikon 20mm f/1.8 ED lens
DayStar 70mm universal solar filter lens cover
Davis & Sanford TR553-P228 Traverse Super Compact Tripod
Sandisk Extreme 128GB CF (120MB/s) memory card
Sandisk Extreme 128GB SD (95MB/s) memory cardCamera 4
GoPro Hero5 Session (for 4K video)
Celestron Eclipsmart handheld filter + masking tape
Smatree tripod mount adapter
EcstaPro Extended Battery
Sunpak 6200 Tripod
Sandisk Extreme 128GB MicroSDXC memory card
©
Davey Morgan Photography | Portrait and Wedding Photographer in Greenville, SC
864-378-2248 | info@daveymorgan.com
Blog | Order Photos | Location Ideas
![]()
![]()
![]()